Revenant hellhound: Difference between revisions
Appearance
For Freedom (talk | contribs) No edit summary |
3hitufreak (talk | contribs) m corrected info |
||
| (4 intermediate revisions by 3 users not shown) | |||
| Line 1: | Line 1: | ||
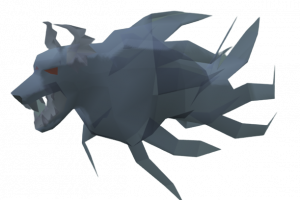
{{Infobox_monster |image=[[File: | {{Infobox_monster |image=[[File:RevHell.png|300px]] |cb=90|hp=160|style=Melee/Range/Magic |max=12/12/12|agg=No |poi=No |unded= Yes |slay=1|master=[[Vannaka]], [[Duradel]], [[Shenven]], [[Krystilia]]|xp=1,660}} | ||
'''Revenant hellhounds''' can be found in the [[Revenant dungeon]]. Be aware that the Revenant dungeon is | '''Revenant hellhounds''' can be found in the [[Revenant dungeon]]. Be aware that the Revenant dungeon is PvP area. | ||
Revenants are much stronger than their combat level suggests, use all combat styles and might snare their attacker. They will heal when their health falls below half. | Revenants are much stronger than their combat level suggests, use all combat styles and might snare their attacker. They will heal when their health falls below half. | ||
== [[Weakness]] == | |||
{{PAGENAME}} is weak to any '''air type of damage''' and players will benefit from a '''50% accuracy boost''' if they attack {{PAGENAME}} with proper damage type. It is also considered an [[Undead monsters|undead monster]] which makes it immune to rot and poison type of damage but vulnerable to the [[salve amulet]] and [[Undead slayer|undead slayer aura]] effects. | |||
==Drops== | ==Drops== | ||
| Line 29: | Line 30: | ||
{{ItemImage|id=14888|caption=Saradomin amphora}}{{ItemImage|id=14886|caption=Saradomin carving}}{{ItemImage|id=14880|caption=Saradomin statuette}}{{ItemImage|id=14877|caption=Seren statuette}}{{ItemImage|id=14891|caption=Third age carafe}}{{ItemImage|id=14885|caption=Zamorak medallion}}{{ItemImage|id=14879|caption=Zamorak statuette}} || <center><div class="mw-collapsible mw-collapsed" style="min-width: 5em; max-width:60em">[[Ancient psaltery bridge]], [[Ancient statuette]], [[Armadyl statuette]], [[Armadyl totem]], [[Bandos scrimshaw]], [[Bandos statuette]], [[Broken statue headdress]], [[Bronzed dragon claw]], [[Guthixian brazier]], [[Ruby chalice]], [[Saradomin amphora]], [[Saradomin carving]], [[Saradomin statuette]], [[Seren statuette]], [[Third age carafe]], [[Zamorak medallion]], [[Zamorak statuette]]</div></center> || 1 || style="background-color:lightsalmon"|Rare (2.4%) | {{ItemImage|id=14888|caption=Saradomin amphora}}{{ItemImage|id=14886|caption=Saradomin carving}}{{ItemImage|id=14880|caption=Saradomin statuette}}{{ItemImage|id=14877|caption=Seren statuette}}{{ItemImage|id=14891|caption=Third age carafe}}{{ItemImage|id=14885|caption=Zamorak medallion}}{{ItemImage|id=14879|caption=Zamorak statuette}} || <center><div class="mw-collapsible mw-collapsed" style="min-width: 5em; max-width:60em">[[Ancient psaltery bridge]], [[Ancient statuette]], [[Armadyl statuette]], [[Armadyl totem]], [[Bandos scrimshaw]], [[Bandos statuette]], [[Broken statue headdress]], [[Bronzed dragon claw]], [[Guthixian brazier]], [[Ruby chalice]], [[Saradomin amphora]], [[Saradomin carving]], [[Saradomin statuette]], [[Seren statuette]], [[Third age carafe]], [[Zamorak medallion]], [[Zamorak statuette]]</div></center> || 1 || style="background-color:lightsalmon"|Rare (2.4%) | ||
|- | |- | ||
|{{ItemImage|id=10344|caption=Third-age amulet}}{{ItemImage|id=10350|caption=Third-age full helm}}{{ItemImage|id=10352|caption=Third-age kiteshield}}{{ItemImage|id=10342|caption=Third-age mage hat}}{{ItemImage|id=10348|caption=Third-age platebody}}{{ItemImage|id=10346|caption=Third-age platelegs}}{{ItemImage|id=10334|caption=Third-age range coif}}{{ItemImage|id=10332|caption=Third-age range legs}}{{ItemImage|id=10330|caption=Third-age range top}}{{ItemImage|id=10340|caption=Third-age robe}}<br /> | |||
{{ItemImage|id=10338|caption=Third-age robe top}}{{ItemImage|id=10336|caption=Third-age vambraces}} || <center><div class="mw-collapsible mw-collapsed" style="min-width: 5em; max-width:60em">[[Third-age amulet]], [[Third-age full helm]], [[Third-age kiteshield]], [[Third-age mage hat]], [[Third-age platebody]], [[Third-age platelegs]], [[Third-age range coif]], [[Third-age range legs]], [[Third-age range top]], [[Third-age robe]], [[Third-age robe top]], [[Third-age vambraces]]</div></center> || 1 || style="background-color:lightsalmon"|Rare (1.2%) | |||
|} | |} | ||
[[Category:Monsters]] | [[Category:Monsters]] | ||
Latest revision as of 13:28, 7 October 2024

| |||||||||||||||||||||||||||||||||||||||||||||
| |||||||||||||||||||||||||||||||||||||||||||||
Revenant hellhounds can be found in the Revenant dungeon. Be aware that the Revenant dungeon is PvP area.
Revenants are much stronger than their combat level suggests, use all combat styles and might snare their attacker. They will heal when their health falls below half.
Weakness
Revenant hellhound is weak to any air type of damage and players will benefit from a 50% accuracy boost if they attack Revenant hellhound with proper damage type. It is also considered an undead monster which makes it immune to rot and poison type of damage but vulnerable to the salve amulet and undead slayer aura effects.
Drops
| Item | Name | Quantity | Rarity |
|---|---|---|---|
| Coins | 3500 - 6000 | Common (40.2%) | |
| 1 | Common (25.0%) | ||
| 1 - 3 | Common (15.0%) | ||
|
|
1 | Common (15.0%) | |
| 1 | Rare (2.4%) | ||
|
|
Ancient psaltery bridge, Ancient statuette, Armadyl statuette, Armadyl totem, Bandos scrimshaw, Bandos statuette, Broken statue headdress, Bronzed dragon claw, Guthixian brazier, Ruby chalice, Saradomin amphora, Saradomin carving, Saradomin statuette, Seren statuette, Third age carafe, Zamorak medallion, Zamorak statuette |
1 | Rare (2.4%) |
|
|
1 | Rare (1.2%) |
