Lucien Van Rot: Difference between revisions
For Freedom (talk | contribs) No edit summary |
3hitufreak (talk | contribs) m fixed slayer xp |
||
| (58 intermediate revisions by 3 users not shown) | |||
| Line 1: | Line 1: | ||
'''{{PAGENAME}}''' is the final boss of [[Rot cave]]. | '''{{PAGENAME}}''' is the final boss of [[Rot cave]]. | ||
| Line 5: | Line 5: | ||
He is immune to [[Rot]] and [[Poison]] damage. He is NOT considered undead even though he looks like a skeleton and is a necromancer. [[Salve amulet]] and [[Undead slayer]] does NOT work on him. | He is immune to [[Rot]] and [[Poison]] damage. He is NOT considered undead even though he looks like a skeleton and is a necromancer. [[Salve amulet]] and [[Undead slayer]] does NOT work on him. | ||
==The fight== | Entering different '''Rot cave instances''' will lead to different boss difficulty. | ||
Here's the following available instance choices: | |||
*Rot cave instance (2p). Meaning only 2 players can join the instance. | |||
*Rot cave instance (3p). Meaning only 3 players can join the instance. | |||
*Rot cave instance (4p). Meaning only 4 players can join the instance. | |||
==Before fighting Lucien make sure you have== | |||
*[[Super antirot]] | |||
*[[Super antipoison]] | |||
*[[Poison heal]] aura | |||
*[[Poison deflect]] aura | |||
== [[Weakness]] == | |||
{{PAGENAME}} is weak to any '''crush type of damage''' and players will benefit from a '''50% accuracy boost''' if they attack {{PAGENAME}} with proper damage type. | |||
{{Infobox_monster |image=[[File:LucienVanRot.png|200px]] |cb= 1,110|hp= 2,600|style=[[Melee]]/[[Ranged]]/[[Magic]] |max=31/59/76 |agg=Yes |poi=No |unded = No |slay=1 |master=[[Shenven]]|xp=26,420}} | |||
==Rot cave instance (2p)== | |||
To enter Lucien Van Rot room, you need to decrease rot percentage till 75%. | |||
To achieve that, the best way would be to kill: 9-[[Rot zombie]], 4-[[Haasghenahk]], 1-[[Shukarhazh]], [[Azzandra]], [[Enakhra]], [[Akthanakos]] and lightning up tomb using [[tinderbox]] in the bottom floor of rot cave. You can see it's location at the picture. | |||
'''In the right corner you can see 2 player instance boss stats.''' | |||
[[File:rottwop.png]] | |||
===Mechanics=== | |||
*Lucien will mainly attack with his ranged autoattack. Praying ranged is advised throughout the entire fight. He will randomly cast a spell on his main target, spawning spikes underneath the player in a 7x7 square that will deal really high damage if the hit lands. The colour of the spikes determine the combat type it will hit as '''(red = melee, green = ranged and blue = magic)'''. This attack can one-hit players to death. There are two ways to deal with this special attack. You can either switch your prayer to match the colour of the spikes, or you can simply leg it. Option number two is prefered since the attack is rather slow. | |||
*At 2050 HP he will spawn [[Wahisietel]]. You can use [[Wahisietel]] poison attacks to heal yourself using [[poison heal]] aura. | |||
*At this point Lucian itself will throw out rot drops around his main target in a 7x7 square, kind of like [[Kal'Ger]]'s meteor shower. Unlike the meteor shower though, this rot isn't guaranteed to land on the player every time, so to prevent covering half of the arena in rot spots. Stand still until you see that the attack is going to actually land on you. he fires up to 4 rounds of rot, but it can be less if he switches targets | |||
*At 1500 HP he will spawn [[Enakhra]]. | |||
*Lucian will now throw out spinning axes randomly, that will bounce between players. It is recommended to spread out as much as possible since the attack will stop if it can't find a nearby player to jump to. This deals melee damage. | |||
*At 1000 HP he will spawn [[Azzandra]] and [[Akthanakos]] and will be summoning [[Dreadnauts]] and [[rot zombies]]. | |||
*At 500 HP he will shout "I will not lose!" and heal himself for 300HP. Nothing else happening during this. Finish him! | |||
==Rot cave instance (3p)== | |||
{{Infobox_monster |image=[[File:LucienVanRot.png|200px]] |cb= 1,210|hp= 3,800|style=[[Melee]]/[[Ranged]]/[[Magic]] |max=34/67/84 |agg=Yes |poi=No |unded = No |slay=1 |master=[[Shenven]]|xp=26,420}} | |||
To enter Lucien Van Rot room, you need to decrease rot percentage till 75%. | |||
To achieve that, the best way would be to kill: 7-[[Rot zombie]], 4-[[Haasghenahk]], 1-[[Shukarhazh]], [[Azzandra]], [[Enakhra]], [[Akthanakos]] and lightning up tomb using [[tinderbox]] in the bottom floor of rot cave. You can see it's location at the picture. | |||
'''In the right corner you can see 3 player instance boss stats.''' | |||
[[File:rottwop.png]] | |||
===Mechanics=== | |||
*Lucien will mainly attack with his ranged autoattack. Praying ranged is advised throughout the entire fight. He will randomly cast a spell on his main target, spawning spikes underneath the player in a 7x7 square that will deal really high damage if the hit lands. The colour of the spikes determine the combat type it will hit as '''(red = melee, green = ranged and blue = magic)'''. This attack can one-hit players to death. There are two ways to deal with this special attack. You can either switch your prayer to match the colour of the spikes, or you can simply leg it. Option number two is prefered since the attack is rather slow. | |||
*At 3000 HP he will spawn [[Wahisietel]]. You can use [[Wahisietel]] poison attacks to heal yourself using [[poison heal]] aura. | |||
*At this point Lucian itself will throw out rot drops around his main target in a 7x7 square, kind of like [[Kal'Ger]]'s meteor shower. Unlike the meteor shower though, this rot isn't guaranteed to land on the player every time, so to prevent covering half of the arena in rot spots. Stand still until you see that the attack is going to actually land on you. he fires up to 4 rounds of rot, but it can be less if he switches targets | |||
*At 2200 HP he will spawn [[Enakhra]]. | |||
*Lucian will now throw out spinning axes randomly, that will bounce between players. It is recommended to spread out as much as possible since the attack will stop if it can't find a nearby player to jump to. This deals melee damage. | |||
*At 1500 HP he will spawn [[Azzandra]] and [[Akthanakos]] and will be summoning [[Dreadnauts]] and [[rot zombies]]. | |||
*At 750 HP he will shout "I will not lose!" and heal himself for 450HP. Nothing else happening during this. Finish him! | |||
{{Infobox_monster |image=[[File:LucienVanRot.png|200px]] |cb= 1,312|hp= 5,000|style=[[Melee]]/[[Ranged]]/[[Magic]] |max=37/69/90 |agg=Yes |poi=No |unded = No |slay=1 |master=[[Shenven]]|xp=26,420}} | |||
==Rot cave instance (4p)== | |||
To enter Lucien Van Rot room, you need to decrease rot percentage till 75%. | |||
To achieve that, the best way would be to kill: 7-[[Rot zombie]], 4-[[Haasghenahk]], 1-[[Shukarhazh]], [[Azzandra]], [[Enakhra]], [[Akthanakos]] and lightning up tomb using [[tinderbox]] in the bottom floor of rot cave. You can see it's location at the picture. | |||
'''In the right corner you can see 4 player instance boss stats.''' | |||
[[File:rottwop.png]] | |||
===Mechanics=== | |||
*Lucien will mainly attack with his ranged autoattack. Praying ranged is advised throughout the entire fight. He will randomly cast a spell on his main target, spawning spikes underneath the player in a 7x7 square that will deal really high damage if the hit lands. The colour of the spikes determine the combat type it will hit as '''(red = melee, green = ranged and blue = magic)'''. This attack can one-hit players to death. There are two ways to deal with this special attack. You can either switch your prayer to match the colour of the spikes, or you can simply leg it. Option number two is prefered since the attack is rather slow. | |||
*At 4000 HP he will spawn [[Wahisietel]]. You can use [[Wahisietel]] poison attacks to heal yourself using [[poison heal]] aura. | |||
*At this point Lucian itself will throw out rot drops around his main target in a 7x7 square, kind of like [[Kal'Ger]]'s meteor shower. Unlike the meteor shower though, this rot isn't guaranteed to land on the player every time, so to prevent covering half of the arena in rot spots. Stand still until you see that the attack is going to actually land on you. he fires up to 4 rounds of rot, but it can be less if he switches targets | |||
*At 3000 HP he will spawn [[Enakhra]]. | |||
*Lucian will now throw out spinning axes randomly, that will bounce between players. It is recommended to spread out as much as possible since the attack will stop if it can't find a nearby player to jump to. This deals melee damage. | |||
*At 2000 HP he will spawn [[Azzandra]] and [[Akthanakos]] and will be summoning [[Dreadnauts]] and [[rot zombies]]. | |||
*At 1000 HP he will shout "I will not lose!" and heal himself for 600HP. Nothing else happening during this. Finish him! | |||
==Drops== | ==Drops== | ||
Players can claim and deposit their loot in the chest next to the [[rot cave]] entrance. | |||
{| class="wikitable" | {| class="wikitable" | ||
| Line 31: | Line 105: | ||
! scope="col" | Rarity | ! scope="col" | Rarity | ||
|- | |- | ||
| | | {{ItemImage|id=7199|caption=Admiral pie}}{{ItemImage|id=21627|caption=Grimy fellstalk}}{{ItemImage|id=210|caption=Grimy irit}}{{ItemImage|id=3050|caption=Grimy toadflax}}{{ItemImage|id=220|caption=Grimy torstol}}{{ItemImage|id=21623|caption=Morchella mushroom}}{{ItemImage|id=2971|caption=Mort myre fungi}}<br /> | ||
{{ItemImage|id=238|caption=Unicorn horn}} || <center><div class="mw-collapsible mw-collapsed" style="min-width: 5em; max-width:60em">[[Admiral pie]], [[Grimy fellstalk]], [[Grimy irit]], [[Grimy toadflax]], [[Grimy torstol]], [[Grimy torstol]], [[Morchella mushroom]], [[Mort myre fungi]], [[Unicorn horn]]</div></center> || 15 - 35 || style="background-color:palegreen"|Common (30.0%) | |||
|- | |- | ||
| {{ItemImage|id=1320|caption=Rune 2h sword}}{{ItemImage|id=1164|caption=Rune full helm}}{{ItemImage|id=1202|caption=Rune kiteshield}}{{ItemImage|id=1128|caption=Rune platebody}}{{ItemImage|id=1080|caption=Rune platelegs}}{{ItemImage|id=1094|caption=Rune plateskirt}} || <center><div class="mw-collapsible mw-collapsed" style="min-width: 5em; max-width:60em">[[Rune 2h sword]], [[Rune full helm]], [[Rune kiteshield]], [[Rune platebody]], [[Rune platelegs]], [[Rune plateskirt]]</div></center> || 6 - 18 || style="background-color:palegreen"|Common (18.0%) | | {{ItemImage|id=1320|caption=Rune 2h sword}}{{ItemImage|id=1164|caption=Rune full helm}}{{ItemImage|id=1202|caption=Rune kiteshield}}{{ItemImage|id=1128|caption=Rune platebody}}{{ItemImage|id=1080|caption=Rune platelegs}}{{ItemImage|id=1094|caption=Rune plateskirt}} || <center><div class="mw-collapsible mw-collapsed" style="min-width: 5em; max-width:60em">[[Rune 2h sword]], [[Rune full helm]], [[Rune kiteshield]], [[Rune platebody]], [[Rune platelegs]], [[Rune plateskirt]]</div></center> || 6 - 18 || style="background-color:palegreen"|Common (18.0%) | ||
| Line 42: | Line 116: | ||
| {{ItemImage|id=17648|caption=Promethium ore}} || [[Promethium ore]] || 1 || style="background-color:khaki"|Uncommon (10.0%) | | {{ItemImage|id=17648|caption=Promethium ore}} || [[Promethium ore]] || 1 || style="background-color:khaki"|Uncommon (10.0%) | ||
|- | |- | ||
| | | {{ItemImage|id=7199|caption=Admiral pie}}{{ItemImage|id=21627|caption=Grimy fellstalk}}{{ItemImage|id=210|caption=Grimy irit}}{{ItemImage|id=3050|caption=Grimy toadflax}}{{ItemImage|id=220|caption=Grimy torstol}}{{ItemImage|id=21623|caption=Morchella mushroom}}{{ItemImage|id=2971|caption=Mort myre fungi}}<br /> | ||
{{ItemImage|id=238|caption=Unicorn horn}} || <center><div class="mw-collapsible mw-collapsed" style="min-width: 5em; max-width:60em">[[Admiral pie]], [[Grimy fellstalk]], [[Grimy irit]], [[Grimy toadflax]], [[Grimy torstol]], [[Morchella mushroom]], [[Mort myre fungi]], [[Unicorn horn]]</div></center> || 35 - 80 || style="background-color:lightsalmon"|Rare (3.0%) | |||
|- | |- | ||
| {{ItemImage|id=16907|caption=Promethium 2h sword}}{{ItemImage|id= | | {{ItemImage|id=16907|caption=Promethium 2h sword}}{{itemImage|id=16291|caption=Promethium gauntlets}}{{ItemImage|id=16357|caption=Promethium boots}}{{ItemImage|id=15771|caption=Promethium battleaxe}}{{ItemImage|id=16731|caption=Promethium chainbody}}{{ItemImage|id=16829|caption=Promethium dagger}}{{ItemImage|id=16709|caption=Promethium full helm}}{{ItemImage|id=16379|caption=Promethium hatchet}}{{ItemImage|id=17359|caption=Promethium kiteshield}}{{ItemImage|id=16401|caption=Promethium longsword}}{{ItemImage|id=16423|caption=Promethium maul}}{{ItemImage|id=16313|caption=Promethium pickaxe}}{{ItemImage|id=17257|caption=Promethium platebody}}{{ItemImage|id=16687|caption=Promethium platelegs}}{{ItemImage|id=16665|caption=Promethium plateskirt}}{{ItemImage|id=16953|caption=Promethium rapier}}{{ItemImage|id=17135|caption=Promethium spear}}{{ItemImage|id=17037|caption=Promethium warhammer}} || <center><div class="mw-collapsible mw-collapsed" style="min-width: 5em; max-width:60em">[[Promethium 2h sword]], [[Promethium gauntlets]], [[Promethium boots]], [[Promethium battleaxe]], [[Promethium chainbody]], [[Promethium dagger]], [[Promethium full helm]], [[Promethium hatchet]], [[Promethium kiteshield]], [[Promethium longsword]], [[Promethium maul]], [[Promethium pickaxe]], [[Promethium platebody]], [[Promethium platelegs]], [[Promethium plateskirt]], [[Promethium rapier]], [[Promethium spear]], [[Promethium warhammer]]</div></center> || 1 || style="background-color:lightsalmon"|Rare (2.0%) | ||
{{ItemImage|id=16313|caption=Promethium pickaxe}}{{ItemImage|id=17257|caption=Promethium platebody}}{{ItemImage|id=16687|caption=Promethium platelegs}}{{ItemImage|id=16665|caption=Promethium plateskirt}}{{ItemImage|id=16953|caption=Promethium rapier}}{{ItemImage|id=17135|caption=Promethium spear}}{{ItemImage|id=17037|caption=Promethium warhammer}} || <center><div class="mw-collapsible mw-collapsed" style="min-width: 5em; max-width:60em">[[Promethium 2h sword]], [[Promethium | |||
|- | |- | ||
| {{ItemImage|id=1320|caption=Rune 2h sword}}{{ItemImage|id=1164|caption=Rune full helm}}{{ItemImage|id=1202|caption=Rune kiteshield}}{{ItemImage|id=1128|caption=Rune platebody}}{{ItemImage|id=1080|caption=Rune platelegs}}{{ItemImage|id=1094|caption=Rune plateskirt}} || <center><div class="mw-collapsible mw-collapsed" style="min-width: 5em; max-width:60em">[[Rune 2h sword]], [[Rune full helm]], [[Rune kiteshield]], [[Rune platebody]], [[Rune platelegs]], [[Rune plateskirt]]</div></center> || 22 - 38 || style="background-color:lightsalmon"|Rare (1.5%) | | {{ItemImage|id=1320|caption=Rune 2h sword}}{{ItemImage|id=1164|caption=Rune full helm}}{{ItemImage|id=1202|caption=Rune kiteshield}}{{ItemImage|id=1128|caption=Rune platebody}}{{ItemImage|id=1080|caption=Rune platelegs}}{{ItemImage|id=1094|caption=Rune plateskirt}} || <center><div class="mw-collapsible mw-collapsed" style="min-width: 5em; max-width:60em">[[Rune 2h sword]], [[Rune full helm]], [[Rune kiteshield]], [[Rune platebody]], [[Rune platelegs]], [[Rune plateskirt]]</div></center> || 22 - 38 || style="background-color:lightsalmon"|Rare (1.5%) | ||
Latest revision as of 18:43, 19 February 2025
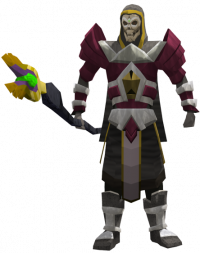
Lucien Van Rot is the final boss of Rot cave.
He is immune to Rot and Poison damage. He is NOT considered undead even though he looks like a skeleton and is a necromancer. Salve amulet and Undead slayer does NOT work on him.
Entering different Rot cave instances will lead to different boss difficulty. Here's the following available instance choices:
- Rot cave instance (2p). Meaning only 2 players can join the instance.
- Rot cave instance (3p). Meaning only 3 players can join the instance.
- Rot cave instance (4p). Meaning only 4 players can join the instance.
Before fighting Lucien make sure you have
Weakness
Lucien Van Rot is weak to any crush type of damage and players will benefit from a 50% accuracy boost if they attack Lucien Van Rot with proper damage type.
| |||||||||||||||||||||||||||||||||||||||||||||
| |||||||||||||||||||||||||||||||||||||||||||||
Rot cave instance (2p)
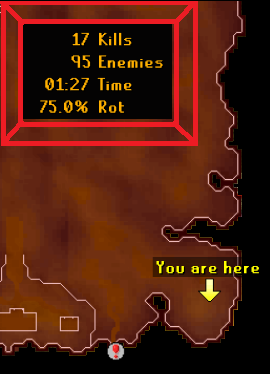
To enter Lucien Van Rot room, you need to decrease rot percentage till 75%. To achieve that, the best way would be to kill: 9-Rot zombie, 4-Haasghenahk, 1-Shukarhazh, Azzandra, Enakhra, Akthanakos and lightning up tomb using tinderbox in the bottom floor of rot cave. You can see it's location at the picture. In the right corner you can see 2 player instance boss stats.
Mechanics
- Lucien will mainly attack with his ranged autoattack. Praying ranged is advised throughout the entire fight. He will randomly cast a spell on his main target, spawning spikes underneath the player in a 7x7 square that will deal really high damage if the hit lands. The colour of the spikes determine the combat type it will hit as (red = melee, green = ranged and blue = magic). This attack can one-hit players to death. There are two ways to deal with this special attack. You can either switch your prayer to match the colour of the spikes, or you can simply leg it. Option number two is prefered since the attack is rather slow.
- At 2050 HP he will spawn Wahisietel. You can use Wahisietel poison attacks to heal yourself using poison heal aura.
- At this point Lucian itself will throw out rot drops around his main target in a 7x7 square, kind of like Kal'Ger's meteor shower. Unlike the meteor shower though, this rot isn't guaranteed to land on the player every time, so to prevent covering half of the arena in rot spots. Stand still until you see that the attack is going to actually land on you. he fires up to 4 rounds of rot, but it can be less if he switches targets
- At 1500 HP he will spawn Enakhra.
- Lucian will now throw out spinning axes randomly, that will bounce between players. It is recommended to spread out as much as possible since the attack will stop if it can't find a nearby player to jump to. This deals melee damage.
- At 1000 HP he will spawn Azzandra and Akthanakos and will be summoning Dreadnauts and rot zombies.
- At 500 HP he will shout "I will not lose!" and heal himself for 300HP. Nothing else happening during this. Finish him!
Rot cave instance (3p)

| |||||||||||||||||||||||||||||||||||||||||||||
| |||||||||||||||||||||||||||||||||||||||||||||
To enter Lucien Van Rot room, you need to decrease rot percentage till 75%. To achieve that, the best way would be to kill: 7-Rot zombie, 4-Haasghenahk, 1-Shukarhazh, Azzandra, Enakhra, Akthanakos and lightning up tomb using tinderbox in the bottom floor of rot cave. You can see it's location at the picture. In the right corner you can see 3 player instance boss stats.
Mechanics
- Lucien will mainly attack with his ranged autoattack. Praying ranged is advised throughout the entire fight. He will randomly cast a spell on his main target, spawning spikes underneath the player in a 7x7 square that will deal really high damage if the hit lands. The colour of the spikes determine the combat type it will hit as (red = melee, green = ranged and blue = magic). This attack can one-hit players to death. There are two ways to deal with this special attack. You can either switch your prayer to match the colour of the spikes, or you can simply leg it. Option number two is prefered since the attack is rather slow.
- At 3000 HP he will spawn Wahisietel. You can use Wahisietel poison attacks to heal yourself using poison heal aura.
- At this point Lucian itself will throw out rot drops around his main target in a 7x7 square, kind of like Kal'Ger's meteor shower. Unlike the meteor shower though, this rot isn't guaranteed to land on the player every time, so to prevent covering half of the arena in rot spots. Stand still until you see that the attack is going to actually land on you. he fires up to 4 rounds of rot, but it can be less if he switches targets
- At 2200 HP he will spawn Enakhra.
- Lucian will now throw out spinning axes randomly, that will bounce between players. It is recommended to spread out as much as possible since the attack will stop if it can't find a nearby player to jump to. This deals melee damage.
- At 1500 HP he will spawn Azzandra and Akthanakos and will be summoning Dreadnauts and rot zombies.
- At 750 HP he will shout "I will not lose!" and heal himself for 450HP. Nothing else happening during this. Finish him!

| |||||||||||||||||||||||||||||||||||||||||||||
| |||||||||||||||||||||||||||||||||||||||||||||
Rot cave instance (4p)
To enter Lucien Van Rot room, you need to decrease rot percentage till 75%. To achieve that, the best way would be to kill: 7-Rot zombie, 4-Haasghenahk, 1-Shukarhazh, Azzandra, Enakhra, Akthanakos and lightning up tomb using tinderbox in the bottom floor of rot cave. You can see it's location at the picture. In the right corner you can see 4 player instance boss stats.
Mechanics
- Lucien will mainly attack with his ranged autoattack. Praying ranged is advised throughout the entire fight. He will randomly cast a spell on his main target, spawning spikes underneath the player in a 7x7 square that will deal really high damage if the hit lands. The colour of the spikes determine the combat type it will hit as (red = melee, green = ranged and blue = magic). This attack can one-hit players to death. There are two ways to deal with this special attack. You can either switch your prayer to match the colour of the spikes, or you can simply leg it. Option number two is prefered since the attack is rather slow.
- At 4000 HP he will spawn Wahisietel. You can use Wahisietel poison attacks to heal yourself using poison heal aura.
- At this point Lucian itself will throw out rot drops around his main target in a 7x7 square, kind of like Kal'Ger's meteor shower. Unlike the meteor shower though, this rot isn't guaranteed to land on the player every time, so to prevent covering half of the arena in rot spots. Stand still until you see that the attack is going to actually land on you. he fires up to 4 rounds of rot, but it can be less if he switches targets
- At 3000 HP he will spawn Enakhra.
- Lucian will now throw out spinning axes randomly, that will bounce between players. It is recommended to spread out as much as possible since the attack will stop if it can't find a nearby player to jump to. This deals melee damage.
- At 2000 HP he will spawn Azzandra and Akthanakos and will be summoning Dreadnauts and rot zombies.
- At 1000 HP he will shout "I will not lose!" and heal himself for 600HP. Nothing else happening during this. Finish him!
Drops
Players can claim and deposit their loot in the chest next to the rot cave entrance.
| Item | Name | Quantity | Rarity |
|---|---|---|---|
|
|
15 - 35 | Common (30.0%) | |
| 6 - 18 | Common (18.0%) | ||
| Death rune | 160 - 270 | Common (17.0%) | |
| Coins | 155000 - 310000 | Common (16.0%) | |
| Promethium ore | 1 | Uncommon (10.0%) | |
|
|
35 - 80 | Rare (3.0%) | |
Promethium 2h sword, Promethium gauntlets, Promethium boots, Promethium battleaxe, Promethium chainbody, Promethium dagger, Promethium full helm, Promethium hatchet, Promethium kiteshield, Promethium longsword, Promethium maul, Promethium pickaxe, Promethium platebody, Promethium platelegs, Promethium plateskirt, Promethium rapier, Promethium spear, Promethium warhammer |
1 | Rare (2.0%) | |
| 22 - 38 | Rare (1.5%) | ||
| Death rune | 410 - 620 | Rare (1.4%) | |
| Promethium ore | 2 - 5 | Very Rare (1.0%) | |
| Mincien | 1 | Very Rare (0.1%) |
